DO-IT-YOURSELF
HOT TUB COVER LIFTER!
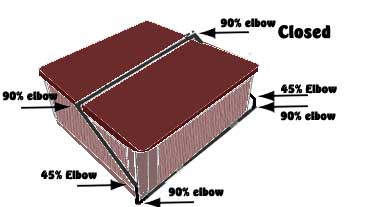

Greetings fellow hot water lovers.
Hot water is, in my opinion, one of the main advantages of civilization, one of the delights of modern society. So of course, we have to have hot tubs. We need to sit and soak, drift and reflect. When it is cold, when the rain falls, in the dark of night, with clouds of steam billowing around us. We attain heaven.

So our new hot tub sits in the garden back against the ivy, and although it's really nice there, it makes taking off the cover much more difficult and there's no place to put it. The last thing I want to do when I'm naked, dripping, and the weather is nearly sub zero is crash around in the ivy trying to get the cover back on.

So I decided we needed some kind of cover lifter. I searched around for products and found a wide variety of designs and styles, but it seemed to me that you didn't get much for a minimum of $160, so I decided to make one myself. I thought there would probably be some good, hopefully free designs out there on the net somewhere, but after exhaustive searching, all I found was a design that you had to pay money for...

Well I paid the money, but then found the purchased design to be ugly and overly fragile. So I decided to redesign it to fit my needs better. After I put it together and found it stronger and more appealing, I thought maybe I should go into competition with the guy I bought my design from, and sell my own, but honestly, it seems like a lot of trouble for not very much money so I decided to just put it out there for free.

THE CONCEPT...

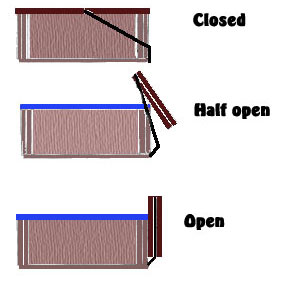
The basic idea here is a modified square of copper pipe that attaches to the rear base of the hot tub and then lays across the seam in the middle of the hot tub cover. When you fold the cover back over the lengthwise piece of pipe, you capture it in the fold. That acts as a kind of hanger for the cover, like a large stiff cloths line.

Then you simply push the cover straight towards the back of the tub and the angle of the square lifts the cover until it is hanging just off the back of the tub. This creates a low wall behind your tub and can be useful as a privacy screen to block the neighbor's view. A small 45 degree offset in the pipe square allows the cover to hang straight down and keeps the support pipe vertical, which limits torque. The space the cover occupies behind the tub is the folded thickness of your cover, but you need approximately 18" of clearance behind the tub in order to make it work. You also attach small pieces of chain from the tub to the supporting pipes to keep it from falling too far back.

When you want to put the cover back on, you just pull it straight back towards the front and it will lower back down to its original position... Then you just flip the cover back closed. This can be done either from in the tub, or from the side.

THE MATERIALS:

  1. 4 3/4 90 degree copper elbows
  2. 2 3/4 45 degree copper elbows
  3. 4 10' pieces of 3/4 copper pipe
  4. copper solder flux paste
  5. solder for copper... or
  6. glue made for bonding copper pipe
  7. copper pipe cutter... or a hacksaw
  8. 2 #6 X 3/4" corrosive resistant deck screws
  9. 2 large screw in utility hooks, or 2 copper pipe straps.
  10. If you use the copper straps, 4 corrosive resistent #8 X 2" deck screws.
  11. 2 #8-32 X 1 1/2 corrosive resistant machine screws
  12. 2 #8-32 corrosive resistant end cap nuts
  13. 5' 3/8 brass chain
  14. Tape measure
  15. Propane Torch
THE PLANS

First off, measure your hot tub cover lengthwise along the seam. Add 2 inches. 
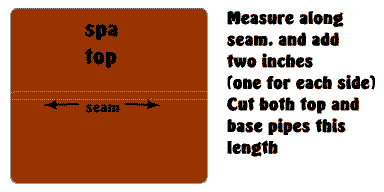
Cut 2 pieces of 3/4" copper plumbing pipe to that length.

Solder or glue the 90 degree copper elbows to the ends of the pipe, being sure the elbows are pointing the same direction.

If you are not comfortable soldering, they make a perfectly good epoxy glue that will work just fine.

Install the large utility hooks near the corners of the backside of the hot tub base pointing up. I like this because it is easy to remove the entire copper frame if you need to. You can also use copper straps and strap one of the copper pipes directly to the base of the tub, just be sure they are loose enough for the pipe to rotate freely.

Place one pipe on the hooks, and the other one along the seam with the ends hanging off the sides.


Take 2 8" pieces of 3/4 copper plumbing pipe (you should have plenty left over from cutting the top and base pipes) solder or glue them into the 90 degree elbows of the base support pipe.

Then glue the 45 degree copper elbows to the 8" pieces, making sure they point forward. They should be parallel to each other. Now, point the 45 degree elbow directly towards the 90 degree elbow on the top pipe. Make sure these elbows (the 90 degree and the 45 degree) are pointing towards each other.

Measure the distance between the 2 elbows and add 2". Cut 2 pieces of pipe to that length, and then solder or glue the resulting pieces from the 45 degrees elbows to the 90 degree elbows. You now have a large copper square with a 45 degree bend in it kind of embracing your hot tub. All this makes sense if you look at the pictures.
Next fold the whole frame up from the cover until it is pointing straight up, find a spot on the pipe about a foot below the top of the cover and make a mark.

Cut the brass chain in half.

Then, drill a hole straight through the pipe parallel to the side of the tub using an 11/16 drill bit. Use the brass machine screw, washer, and end cap to attach one piece of brass chain to the pipe.

Stretch the chain from the copper pipe to some convenient spot with solid wood, I used the base, and then using the wood screw, attach it to the side of the tub. Repeat this process on the other side.

Now the frame will be supported straight up while sitting in the utility hooks. Fold the frame back down (once the glue is dry, of course) so that the top bar rests along the cover seam. Fold the front half of the cover over the pipe. Now push the cover towards the back of the tub. It will lift up until it is hanging from the top pipe behind the hot tub. One refinement would be to add a 1" pipe over the 3/4" pipe before soldering on the end elbows (about 2 inches shorter than the top pipe). This makes a kind of swivel to ensure nothing binds up while lifting, but I don't think this is really necessary.
To close the tub, just put the cover back towards the front and it will lower back down, then all you do is fold the cover back closed.

Last but not least... I have decided not to try and charge people for this cover lifter design, but all the same, if you try it out and find it is useful to you, It would be really nice if you let me know you appreciate it. If you try it, or have your own design, send me a description and a picture and I'll add it to the site.

Eliot

Pictures of
the finished product

Drop me an e-mail
and let me know
what you think,
Or if you have any questions...
I would also love to hear
suggestions and feedback!


[an error occurred while processing this directive]